
 7722
7722
ENGLISH
Students can view their Relay billing statements by term on Nelnet to identify their financial obligations. Students can make payments to their accounts and/or add an authorized party to make a payment on their behalf.
-
An Authorized Party is a FERPA-compliant third party that the student has authorized to access their information or make payments on their behalf. The student can add and remove authorized parties on their user account.
Instructions:
-
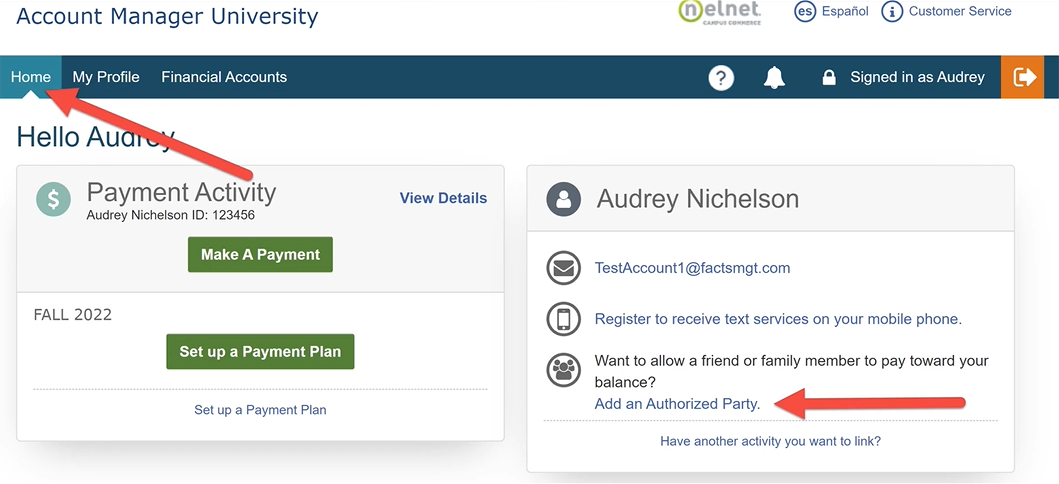
Log in to your Nelnet account
-
Select ‘Add an Authorized Party’ and enter the details
Adding an authorized party permissions:
-
Authorized Party (AP) Information: Complete the First and Last Name fields.
-
Students can check to include the details that make up their balance.
-
This allows the authorized party to view the transaction details that make up the student's balance.
-
-
Authorized Party Authentication: The authorized party will receive an email invitation to create an online account.
-
For security purposes, they will have to know the correct answer to this security question to gain access to create an online user account.
-
The AP should contact the student if they don't know the answer to this security question.
-
-
Web Access: The student determines whether the authorized party can create an online account by entering their email address.
-
Upon saving, an email will be generated to the authorized party inviting them to create a user account.
-
-
Terms and Conditions: Provides information about what they are authorizing.
-
Click Save.
-------------------------------------------------------------------------------------------------------------
ESPAÑOL
Los estudiantes pueden ver sus estados de cuenta de Relay por período en Nelnet para identificar sus obligaciones financieras. Los estudiantes pueden realizar pagos a sus cuentas.y/o'agregar una parte autorizada para realizar un pago en su nombre.
-
Una parte autorizada es un tercero que cumple con FERPA y que el estudiante ha autorizado para acceder a su información o realizar pagos en su nombre. El estudiante puede agregar y eliminar partes autorizadas en su cuenta de usuario.
Instrucciones:
-
Inicie sesión en su Nelnet cuenta
-
Seleccione "Agregar una parte autorizada" e ingrese los detalles
Agregar permisos de parte autorizada:
-
Información de la parte autorizada (AP): complete los campos Nombre y Apellido.
-
Los estudiantes pueden verificar para incluir los detalles que componen su saldo.
-
Esto permite a la parte autorizada ver los detalles de la transacción que componen el saldo del estudiante.
-
-
Autenticación de parte autorizada: la parte autorizada recibirá una invitación por correo electrónico para crear una cuenta en línea.
-
Por motivos de seguridad, deberán conocer la respuesta correcta a esta pregunta de seguridad para obtener acceso y crear una cuenta de usuario en línea.
-
El AP debe comunicarse con el estudiante si no sabe la respuesta a esta pregunta de seguridad.
-
-
Acceso web: El estudiante determina si la parte autorizada puede crear una cuenta en línea ingresando su dirección de correo electrónico.
-
Al guardar, se generará un correo electrónico para la parte autorizada invitándolos a crear una cuenta de usuario.
-
-
Términos y Condiciones: Proporciona información sobre lo que están autorizando.
-
Clic en Guardar.

